Showing posts with label card. Show all posts

Friday, July 19, 2013

A Beautiful Rose

Happy Friday My Creative & Crafty Friends!

Today I am going to share a card made by a new friend, Bart.  He was visiting his friend, from Los Angeles and they both stopped by the Seaside Farmer's Market that I participate in every other Saturday.

I was very excited that someone else besides me loves to be creative using stamps.  (I only say this here because with my experience I learned that the FM customer's rather buy something that was created versus creating something themselves :))

Here's the beautiful card he made using the Love Blooms Stamp Set.

Created by Bart
I really love how he distressed the edge of the card and looks water colored.  If you would like to get in contact with Bart please send me a message and I will provide you with his contact information.  He currently does not have a website.

Happy scrappin'!
Melika

Monday, June 10, 2013

Super Hero!


Happy Monday my Crafty & Creative Friends!

Just wanted to share this "Super Hero" card with you all!  My sister asked me to make a super hero birthday card for a five year old.  Me, having no kids, not a big fan of comics, although, I kinda grew up around it, and not a collector of boy themed scrapbooking stuff this is what I came up with.

I got the stamp from an old CTMH stamp set & I wet embossed it.  I used a honeycomb embossing folder to make "Superman's" chest. :)

It was fun, easy, and quick to make this card.  It's blank inside.  Perfect for any age and any occasion, including Father's Day coming up on Sunday!

Check out the Father's Day cards I made here.

Happy scrappin'!

Thursday, June 6, 2013

OH I am Blessed...


Happy Thursday My Creative & Crafty Friends!

I apologize I missed yesterday's post it's because I didn't finish the last project I wanted to share.

I hope your hump day went swell, mine for the most part did and I hope your Thursday is even better...it's pre-Friday!

Before I get on with the crafting stuff I want to share what I did on Tuesday because I was just so ecstatic.  I had family visiting from Texas and it was their last day so I decided to go with them on one of their outings.  They wanted to go to the beach and I haven't gone in a long time so I gave myself permission to go.  The weather didn't look too promising, according to our phone weather apps, it was 69 degrees.  To us San Diegans, that's cold, to our visitors, that's kinda warm.  Considering that in Texas the weather  at that time was 98 degrees (we checked Texas' weather to compare).

We loaded my boogie boards, mat, towels, and snacks in my car and off to Coronado Beach we went.  I usually don't board there because the walking distance from the sidewalk to the ocean seems like the length of a football field, not to mention the sand is hot, the waves usually look wimpy because it's a peninsula, and although, there's mountains to block the wind-it's windy!

BUT, to my surprise, Coronado Beach proved me wrong and I'm glad it did!  The beach is way closer than the other ones I go to.  The waves were good sets and not choppy aka I'm not struggling to catch my breath because the first wave knocked me down and I'm trying to get back up as quick as possible before the next one knocks me down = Happy ME.

My aunt said that she can hear me screaming from shore and she wasn't sure if I needed help or if I was screaming because I caught a wave.  It was the latter of course!  I thought the sound of waves breaking and the wind blowing would cover up my screams. lol


Look at the distance...this is at a angle of course, but you get the idea of how huge the beach is.

This was taken at Pacific Beach, but this is how it was at Coronado on Tuesday.  Love. Oh and those are surfers not boogie boarders or as most would call it body boarding.
Oh, I am blessed,  after the beach my aunt treated us kids to Niederfrank's Ice Cream Shop, if you ever visit San Diego- must try their ice cream, homemade and all natural. nom nom.  Then she treated us to "The Barn's" rolled tacos on Euclid. 

After taking a few hours off from making handmade cards for the Farmer's Market I went back to work.

Here are few I made:

A friend asked me to make this card for her. I used the Chantilly Paper Packet.


I made this card in honor of Bruno Mars mom and my friend's grandfather, in which they both passed on the same day. I used the Cricut Art Philosophy Cartridge and the A Blossom Acrylix Stamp Set.
My Aunt gave me challenge to make "thinking of you" cards so the next few cards will be just those.  Wanted to add that I just learned that I love the "A...." acrylix stamp sets because they are perfect for a quick card.  I used the Cricut Art Philosophy Cartridge, A Blossom Acrylix Stamp Set and CTMH marker.


Because my aunt was giving me a challenge I just started going through the current stamps sets I had in alphabetical order.  This card design is borrowed from the current idea book.  A Blossom Acrylix Stamp Set
I have been wanting to use this Acrylix Stamp Set, A Bowwow, but I just never got around to it.  This design is also borrowed from the current idea book with a few of my own touches.

See the stamp set comes with two sentiments.  Makes cards fast, fun, & easy.  This is the last card I made using the "A..." series.


I never know how to use birthday themed stamp sets.  This card is also borrowed from the current idea book.  Card Chatter-Birthday Acrylix Stamp Set and Chantilly Paper Packet. is used for this card.
This card is also borrowed from the current idea book.  I used Surf's Up Paper Packet and Card Chatter-Birthday Acrylix Stamp Set.  My husband and my brother, both said, "those look like fire crackers."  I thought they were candles and thought the designer did a perfect job adding them to this card.  I wasn't sure if I was going to be able to pull it off, but they turned out just fine.

So my up-line sent me a beautifully handmade card using the June SOM and a beautifully handmade envelope and she inspired me to make my own.  I'm usually stingy when it comes to using B&T paper for envelopes because I just can't imagine using nice paper for an envelope-most people don't keep those.  I know I don't.  But, of course the one she made me I am keeping.  I used an old B&T paper to go with the previous card.  It doesn't match, but the colors are similar.
This is what the inside looks like.  I used the Martha Stewart Score Board to make the envelope.  It doesn't have instructions on how to make and envelope for a 5x7" card but it's easy to estimate.  I even rounded the flap this time.  You can check out this Post to see how I made them before.

Which, by the way, have you seen this product by We R Memories?  I recently learned about it checking my emails yesterday.   It's their new Envelope Punch Board.  I really love it! I know I don't need it though.  This video inspired me to corner punch the flap of my envelope.

Oh, I am Blessed, this is the handmade card that my up-line gave me.  Don't you just love it?  I really love the tulips in this SOM.  I can't wait to receive mine in the mail.
I know this was another long post and likely unnecessary sharing, although, blogging is a lot of work, I love it.  I'll try to keep my posts shorter.  Who has time to read an on-line diary anyway? ;P

Happy scrappin'!

Wednesday, May 29, 2013

Dream Pop Projects

Happy Hump Day My Crafty Friends!

Have you seen the Geico "Hump Day" commercial?  It's freakin' hilarious!  (must be said like Hula in Adam Sandler's movie, "50 First Dates).


 My motto is: "No matter what you do (for a living), HUMP day is HUMP day." I currently yoga, blog, craft, and babysit my sister's kids, and OMG, they know when it's HUMP day. =)  I love them so much though.  HOWEVER, today's hump day began with dropping off all of my ohana to the airport for travel to HI, first Maui for a wedding and then Oahu for pleasure.  The hubs and I decided not to go for many reasons: He has a solo art show next week, financials, and we have another Maui wedding in November, in which it's one of my best friends so we had my ohana represent us the first time around. :)

Okay enough of  me blabbing, just wanted to remind everyone that it's getting down to the last days of the CTMH May 2013 National Scrapbooking: Dream Pop Paper Packet Special...Anyone still wanna order? Spend only $35 and you can get this diverse packet for only $10. =) I love it!  Usually when I buy the constant campaigns and SOMs until AFTER the fact.  So I am impressed with myself that I actually used them during the month of.

Here's what I created so far (I really took advantage of it!):

You Make My World Go 'Round
Aileen's Guest Bridal Party Card


Birthday Card

Aileen's Wedding Scrapbook Page

Harriet Tubman

Dream Catcher

Friendship Card

Owl Scrapbook Page

Aileen's Bridal Entourage Card


6 x 6 Handmade Scrapbook

Happy scrappin'!

Monday, May 27, 2013

Happy Papa's Day Card

Hi there my Crafty & Creative Friends!

Hope you had a wonderful weekend!  I FINALLY took a day off from the daily obligations of life and took Saturday to rest.  I almost slept all day, but I managed to watch a Korean Horror movie on Netflix and make two Father's Day Cards. YEE!

The first card I created I wanted to use the mustache image from the Acrylix Stamp Set: Perfect Fit-Dad because mustaches are really in. =)  I attached the the mustache to a 2 x 3 1/2 inch Acrylix Block and used black pigment ink to stamp the mustache, used Clear Embossing Powder and a Craft Heater to give it a matte look.  The image was cut using the Cricut Artiste Collection cartridge.

I also wanted to make like a young elementary school kid made the card using letters cut from a magazine.  To make this happen I used Acrylix Stamp Set:Trinity Alphabet and the 1 x 1 inch Acrlyix Block to individually stamp each letter using Saddle Ink, Slate Ink, Dessert Sand Ink, and Olive Ink.  I then individually cut each letter and distressed each letter with the coordinating color.

Then I adhered everything to Indian Corn Blue Cardstock.

As, Pumba would say from Disney's movie The Lion King, "Simple, yet satisfying." 


The second card I made, I wanted to use the "Tie" Image from the Acrylix Stamp Set: Perfect Fit-Dad.  I didn't want to just paste the tie onto the base of the card, I wanted it to be on a shirt.  Then I remembered that the Cricut Artiste Collection had an image.  Originally I was going to keep the card "As Is" (shaped like a shirt), but the card was too small for a standard A2 envelope and I didn't want to make my own envelopes this time around so I dry embossed Goldrush Cardstock using a houndstooth embossing folder and a Big Shot Machine for the base of the card.

The shirt was too white for me so I lightly distressed all the edges of the shirt with a dauber and Buttercup Ink.  After cutting shirt with the Cricut Artiste Collection cartridge, I cut the "tie" image. Then I attached the "tie" stamp image to a 1 x 3 1/2 inch Acrylix Block  and inked it with Outdoor Denim Ink. To give the shirt a "Seal of Approval," I attached the "World's Greatest" image to a 2 x 2 inch Acrylix Block and stamped  in Goldrush Ink  and cut it out by hand. I know my sister said I was ridiculous, but once I got going it was easy peasy.  I'm sure I'll regret it in the future. I then wet embossed the "Dad" image in black (same as in the first card) using a 1 x 1 inch Acrlyix Block.

And, I was once again satisfied.  YEE! Two card designs done!


Are you getting ready for Father's Day too?  I would love to hear what you are creating.  Or if you need some help, please let me know and I would be happy to assist you.

Happy scrappin'!


Saturday, May 25, 2013

Aileen's Card


Hello Crafty Friends!

I am sorry for not posting yesterday, but our internet was pooped and I don't know how to fix it. AND the person that fixes it for us was working an all nighter.  (He is an assistant to a wedding photographer and videographer).  You can check out his awesome work on his website.

Well, this late post is going to be about the Mojo Monday Sketch.


If you follow me on Facebook you would had noticed that I originally wanted to make a baby card with this sketch, but my friend 
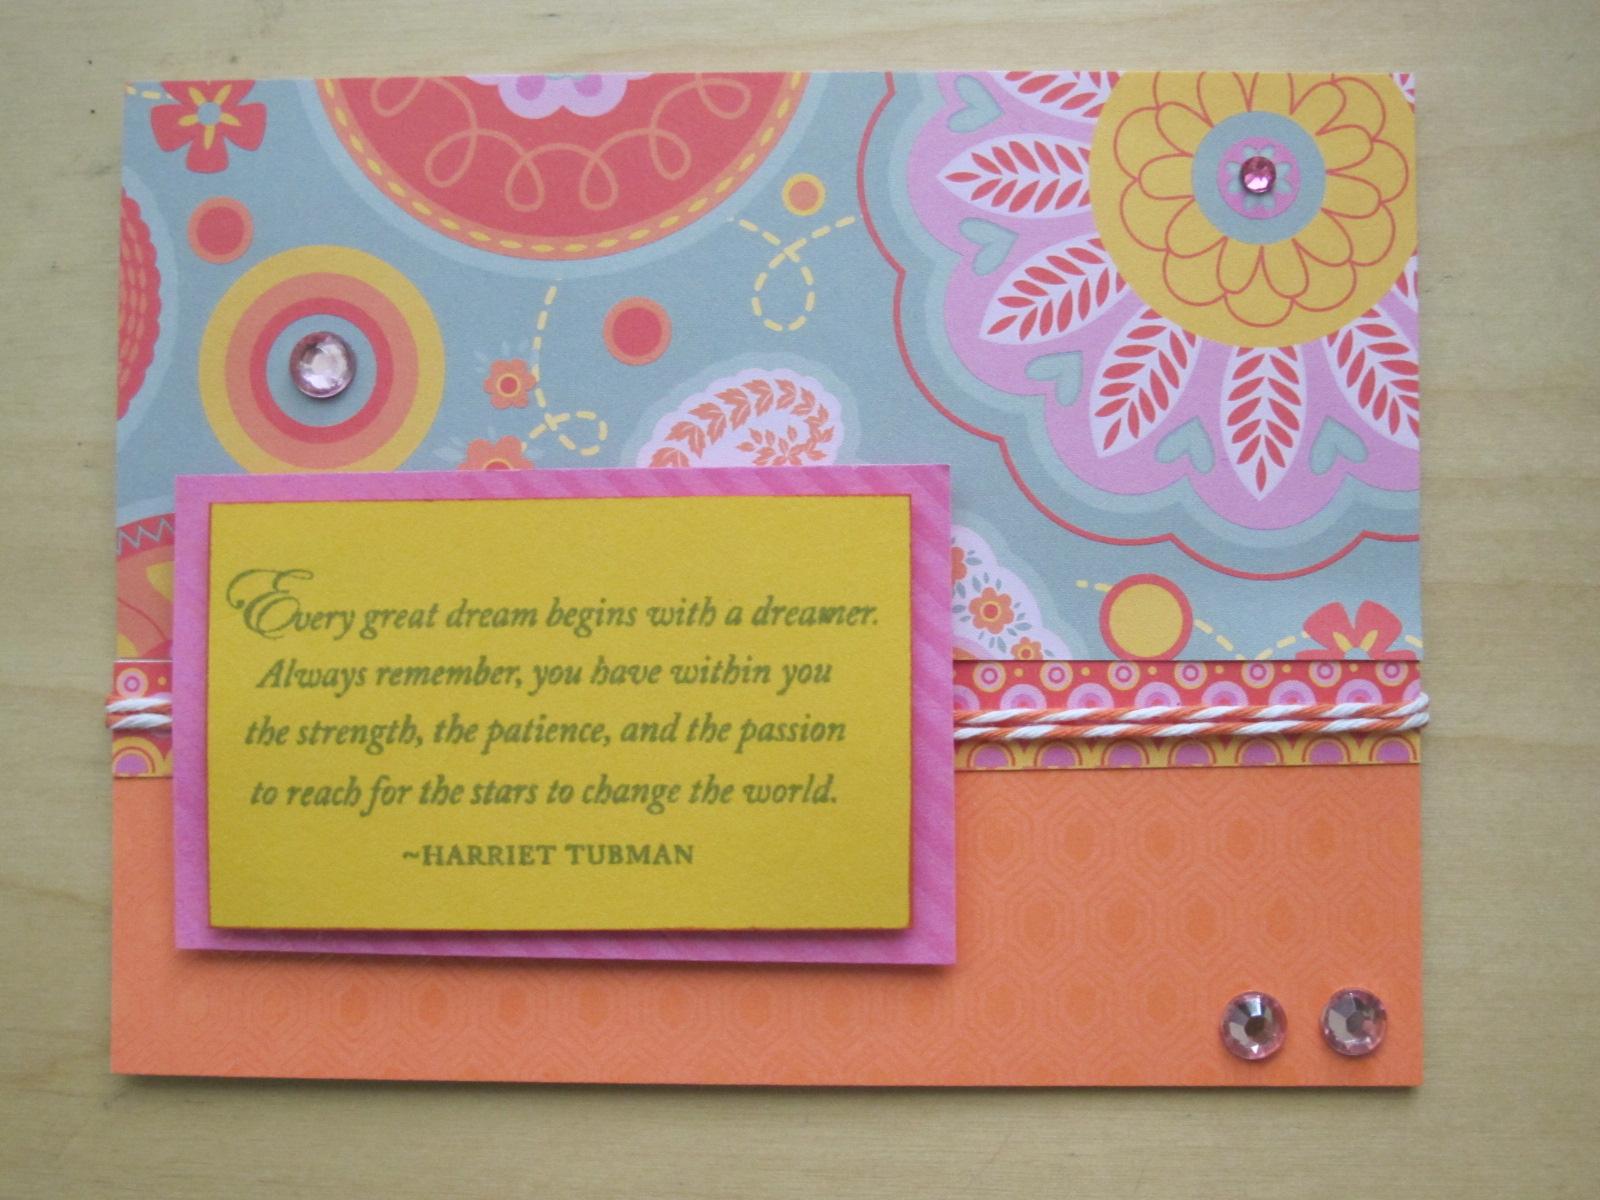
Aileen honored me by asking me to make thank you cards for her bridal entourage using mint, coral, light pink, and gray.

This is what I created using the May 2013 National Scrapbooking Paper Packet: Dream Pop Special.

Card Word Puzzle and In the Background stamp sets.


I have been wanting to play with water coloring (ink & water brush) so I tried it out with the flowers in hopes to get the colors she asked for.  I used Juniper, Blush, Sorbet and Olive Ink I was really surprised that the Sorbet Ink worked out as an okay coral color because to me it's really orangy, but I am not a color expert and I was just really happy it worked out. 

I had a lot of fun playing with the water brush, it was definitely a learning experience I had to learn how much water was needed to create the color I wanted. It does take time, but once I had my flow I was done in no time.

Hope you join the Monday Mojo fun!

Aileen had previously asked me to make her guest bridal party thank you cards, in which I was honored at that time, too, so I was surprised when she asked me to make a new set.

For the first design I made for her she requested for mint blue, gray, and lace.  I knew I wanted to use the Love Doily Acrylix stamp, Colonial White Rosette Ribbon, and that I had gray ink and paper.  But, I was a little worried about the mint blue.  It’s the new color of the year, technically emerald green, but for spring and weddings, mint blue is the "It Color".  I browsed through my ink.  I grabbed Lagoon at first, but I knew it was too bright and too deep (it was my wedding color).  I kept browsing and found Juniper.  I was super stoked, EXCEPT I didn’t have any Juniper Cardstock.  (Sigh), then my light bulb went on->Look through the Paper Packects because, they not only have the printed cardstock, but also have coordinating cardstock.  Sadly, I found nothing and none of the printed cardstock was too my liking.  I knew I had to think outside the box.  I almost forgot about the National Scrapbooking Special Paper Packet.  I looked at the zip strip description and on it read: “mint.”  BIG SMILE!  Then, I thought to myself, “awe, we don’t carry that ink color.  I wonder if this will be a new color in the new catalog.”  (I don’t know if it is, but Juniper is a good match).


It took me about 45 minutes, maybe an hour to put this card together.  I knew I wanted to place the Love Doily Acrylix stamp in the middle because I just placed it there and BAM I loved the placement.  I was thinking I would have used it as a background or off to the side, but I liked it just as you see it.  I chose to use the National Scrapbooking Special Paper Packet’s mint as the base of the card because I wanted to show the texture and it was the only paper I had close enough to mint blue.

I knew it would be difficult and tedious to cut out the doily, but this card needed depth.  I stamped the doily twice, first with gray ink, cut that out and then with juniper to cut out the center of the doily.  I popped up the flower to show more depth.  Because I used the Colonial White Rosette Ribbon under the base of the doily, I had also popped up it up with dimensional tape.  The “Thank You” stamp I used is discontinued (D1361). I stamped it with black and cut it out.  And distressed it with gray ink and juniper using daubers.  I also distressed the doily with the same colors. 

Placing the doily on the top of the mint B&T was BLAH aka plain, so I put white cardstock behind it.  Still BORING!  Ugh.  Then I remembered I had an embossing folder named, Lacy Brocade.  I dug it up and embossed the white paper.  YULK!  Still not satisfied, so I started to lightly distress it with juniper; not enough,  added the gray; not enough, added more juniper.  It just looked so plain.  So I decided to distress the sides with gray ink and that did the trick.

I put the card together and then added the pearl opaques.

Finally I was satisfied and so was Aileen.


I also made her this scrapbook page using paper from the May 2013 National Scrapbooking Paper Packet: Dream Pop Special  and putting it in a shadow box.


Thanks for reading and Happy scrappin’!


Monday, May 20, 2013

Embossing

Happy Monday my Crafty & Creative Friends!

Did you have a great weekend!? I sure hope so.  It was another busy one for me from hanging out with friends, making cards, Relay for Life, a 4-miler, and shopping with great people!  I really cannot complain, but sometimes I wish I wouldn't over book myself and take time to relax.  Sure, I practice yoga four times a week, but that's just not enough.  Anyway, enough about my jumbo bumbo.  Let's talk crafty.

So I recently started using CTMH pigment ink because I wanted to start embossing stamped images.  Although, embossing has been around for quite some time, in my stamping career I never liked it.  To me it's messy and a lot of work.  But, it definitely makes a difference on a simple card and I now like wet embossing.

I wish I remembered where I put my mom's wedding save-the-date cards because we embossed all of them!  Boy, that was a fun, messy, late night bonding experience!  That was about 8 years ago and that is when I said to myself, NO to EMBOSSING. lol.  It would have been a great example to share why it's a love/hate thing with embossing (wet).

In any case, I embossed my last Mojo Monday card entry and I used the embossing technique on the card I gave my friend for the loss of his mom to cervical cancer.

Rest in Peace Mrs. FM


On the morning of her services I learned that her favorite color was purple so decided to stamp lavender flowers and emboss them with clear embossing powder. Clear embossing flower can be used with any pigment colored ink.  Remember, I originally did not like wet embossing so I don't have all the color embossing powders.  I told myself I would only buy clear because it's universal.  If you want your embossed image to have more depth, it's best to use the same color.  I then added a turquoise ribbon because it is the color for cervical cancer.


The lavender flower image I used is from a retired CTMH stamp set, Treasure Life.  It’s an oldie, but goodie.  As a CTMH Consultant for only two years, but a customer for at least ten, it’s always tempting to get rid of retired stamps, but it’s also difficult to because it’s never known when it’s going to be needed.  (My husband would call me a hoarder after making this statement).  So I apologize for yet again sharing a retired stamp image.  On a happier note, the sentiment stamp set is current, it’s CardChatter-Sympathy and stamped with Lagoon Ink.

I also want to share a CTMH You Tube Video on the new Stamp Scrubber.  


I haven't bought this yet, but I do kinda want it.  I know it's a lot smaller than the last scrubber, but I  believe in the bristles.  

Oh, this is the luminaria I drew in honor of my friend's mom at my team's ACS Relay for Life this weekend. (and this is why I stamp because I cannot draw).


Don't forget to join in the Mojo Monday fun!  I'll be hopefully working on it this week.

Happy scrappin'!


Wednesday, May 15, 2013

You Make My World Go 'Round

Happy Wednesday my Creative & Crafty Friends!

Today I will be sharing with you Mojo Monday's Sketch!   Have you joined the fun yet? It's FUN & FREE and for ME it gets me thinking outside my BOX!  Give it a try!  I'd love to see what you create.


https://blogger.googleusercontent.com/img/b/R29vZ2xl/AVvXsEie-2aLwmnMi1edp45fbj54t2WGnr8rh8h5Gd_R9-bb8FreCObiOdiLl1JKAX-8OcZ0wV2DDfRdqtQ94fQhE9a_9-bBpUEF4n1rMhpbNXFFiwbKwsCcN8UY1XvkVyH77oeeGisosjfvIXvF/s1600/Mojo293Sketch.gif
Mojo Monday Sketch

I made this card with my friend in mind because she has recently showed interest in pinwheels so I thought I'd use the May Stamp Of the Month and Dream Pop Paper Packet (Yes, I am STILL using the packet! I just LOVE it! It's so versatile!)  Her birthday is coming up this Thursday,  actually tomorrow. =)  Time is sure flying this week!  Although, I didn't use a "birthday" sentiment, I thought using the "You make my World go 'round"is perfect for her because she makes a difference not only in my world, but in many others-she is very kind-hearted and always there for everyone.


You probably can't tell in this photo, but I inked the pinwheels with hollyhock and sunset pigment ink and used the embossing prisma glitter to give the pinwheels have a little...sparkle.

Well, I hope you'll join the Mojo Monday fun with me!

Happy scrappin'!

Friday, May 10, 2013

Hi from Arlynn

Just wanted to share this card with you all!  My friend, Arlynn, was so kind to visit me and my friend's booth at The Salvation Army Craft Fair a couple of weeks ago, she took a picture of my friend and I AND she was too sweet to send us this personal card.  I love it!


Now this is an awesome way to begin the weekend! Have a blessed one everyone and Happy Mother's Day!

Happy scrappin'!

Monday, May 6, 2013

Birthday Card


Happy Monday My Creative and Crafty Friends!

Here's Mojo Monday's design for this week:
https://blogger.googleusercontent.com/img/b/R29vZ2xl/AVvXsEiY3ck-m0Qo4G8SNUqJNjzATN16yfLJ5Sp7E6rZ3eZ0j1Lu82wf1sf8_4u3dHbFUR0kfG8GdpaUGsSDbIcQ4bCyakoh49y7dtFZGLo0ee_AO7DrMZgHedLChPlLg-SU7ESrZkooa9vzfloa/s1600/zzMojo292Sketch.gif

Be sure to join the fun!  Visit the Mojo Monday Blog Here.

Not only is Mother's Day coming up, but so are many birthdays! So I decided to make a birthday card for a friend with this weeks sketch.  She's lucky too, my other friends received a store cards for their birthdays.  I'm a card maker, but I rarely make birthday cards....


I used the National Scrapbooking Paper Packet, Dream Pop! for this card.  My friend loves bright colors and fun prints so I thought this paper combo would be perfect for her.  I also rarely stamp anything in the inside of cards, but Card Chatter-Birthday Acrylix Stamp Set has perfect sentiments for both, outside of a card and inside with matching fonts and makes sense. In the inside of the card it reads: "and many, many more.

Here are the delicious ingredients I used for the making of the card:


Happy scrappin'!


Wednesday, May 1, 2013

Close to My Heart May Card Contest

Whoa!  Just found out that Close to My Heart is having a May Card Contest!  Watch this video and make a shout out!


Good luck!

Wednesday, April 24, 2013

Mother's Day Cards Continued =)

Happy Hump Day My Crafty Friends!

My friend, owner of Custom Cool Covers and number one supporter always honors me with sharing my handmade cards with her friends and family members.  She really loved my last Mother's Day Card that she was interested in three additional cards, in which she only asked for two different designs.

I was so excited about her request that I decided to make two different cards in addition to the two she requested. 

Here is Card 2 inspired by this Mojo Monday Sketch.  I was too late entering that weeks entry, but I loved it so much that I decided to still use it. :)


Card Size: 5 ½ inches x 4 ½ inches

Cuts:
Base Cardstock paper cut @ 5 ½ inches x 4 ½   inches
B&T Cardstock cut @ 5 ¼ inches x 4 inches
Square Cardstock Base cut @ 3 ½ inches x 3 ½ inches 
Square B&T Cardstock cut @ 3 ¼  inches x 3 ¼  inches
Page 33 cricut 3 @ 1 ½ inches
 
Materials:
Acrylix Stamp PerfectFit-Mom
Instructions:
1.  Gather your paper packet, coordinating embellishments, and stamp sets.
2.  Cut Cardstock at 5 ½ inches x 4 ¼ inches. Tape to the base of the card.
3.  Cut B&T cardstock at 5 ¼ inches x 4 inches.   Tape to the 5 ½ x 4 ¼ Cardstock base.
4.  Cut 3 pieces of ribbon or printed cardstock and tape to the B&T cardstock at 5 ¼ inches x 4 inches.
5.  Cut Square Cardstock Base cut @ 3 ½ inches x 3 ½ inches and round opposite corners with a corner punch.  Then tape on the B&T Cardstock with a little bit of the ribbon showing.
6.  Cut Square B&T Cardstock cut @ 3 ¼  inches x 3 ¼  inches and round opposite corners with a corner punch (the same corners as in step 5.) Tape over the Square Cardstock Base cut @ 3 ½ inches x 3 ½ inches.
7.  Cricut 3 @ 1 ½ inches and stamp image with sunset ink.
Attach 3-D tape do the image.
8.   Add  sparkles

My friend also liked this card on my facebook fan page. I didn't have the paper anymore, but luckily I still had the stamp set.  It's an old Stamp of the Month from a couple years back.  Here is Card 3:


Card 4 is also inspired my Mojo Monday's Blog, again I was too late to enter, but still inspired.


Happy scrappin'!

Monday, April 22, 2013

Shopping Mall Card for the Perfect Fashionista!

Happy Monday My Crafty Friends!

It's Mojo Monday time!  Here's a shopping mall card for the perfect fashionista in your life!


Great for the perfect fashionista's birthday, any occasion, and gift card(s).  :)

Product used:
For Always Paper Packet
Ruby Ink
Honey Ink

Happy scrappin'!


Happy Earth Day!


A Tree

Happy Earth Day!

Friday, April 5, 2013

Mother’s Day Card


The Chantilly Paper Packet, acrylix Perfect Fit-Mom Stamp Set, and the Mojo Monday Blog inspired this Mother’s Day Card and not to mention, Mother’s Day is just around the corner. :)


I really love the spring colors in this set.  The colors are almost similar to the last project I posted.


Card Size: 5 ½ inches x 4 ½ inches


Cuts:
Base B&T paper cut @ 5 ½ inches x 4 ¼  inches
Ribbon B&T paper cut @ 1 inch x 3 inches
Cardstock cut @ 5 ¼ inches x 4 inches
Page 21 cricut <Circle1> @ 1 ¼ inches
Page 44 cricut <Rctngle1> @ 2 ¾ inches


Materials:
Acrylix Stamp Love Doily
Acrylix Stamp Perfect Fit-Mom

Instructions:
1.  Gather your paper packet, coordinating embellishments, and stamp sets.
2.  Take your card and round the corners with a corner punch
3.  Cut a B&T paper at 5 ½ inches x 4 ¼ inches and round the corner with a corner punch.  Tape to the base of the card.
4.  Cut cardstock at 5 ¼ inches x 4 inches.  Round the corners with a corner punch.  To make the stitches, use the “stitching” ruler to mark the holes.  Then remove the ruler and use a marker to have the illusion of the card has been sewn.  (Tip: the removal of the ruler provides a realistic sewn look).  Tape to the 5 ½ x 4 ¼ B&T base.
5.  Stamp the Love Doily image on a White Daisy Cardstock with Sunset Ink.  Then cut the image out with Scissors.  Tape onto cardstock.
6.  With the Cricut Art Philosophy Cartridge cricut <Rctngle1> @ 2 ¾ inches (Page 44).  Tape to the 5 ¼  x 4 Cardstock and cover half of the Doily stamped image.
7.  Cut a coordinating B&T paper @ 1 inch x 3 inches to make a ribbon.  Then use Scissors to make the ends of the ribbon or use a square punch.  Tape the ribbon over the B&T <Rctngle1>.
8.  Cut the “Zip Strip” from the B&T cardstock and align with the <Rctngle1> edge.
9.  Stamp “World’s Greatest” image with Cotton Candy Ink.  Then punch with a 2” Scallop Circle.  Tape over the paper ribbon.
10.  Cricut <Circle1> @ 1 ¼ inches (Page 21). Then stamp the “mom circle” image with Sunset Ink.  Adhere with 3-D tape.
11.  Add embelishments.
 

 Viola!  You have your Mother's Day Card!

Happy scrappin'!